
We’ve all been there. You’re deep in a "flow state," finishing a high-stakes report or designing a new project, when suddenly, you feel it—a slow, mechanical sigh as your chair sinks two inches toward the floor. You pull the lever, it rises back up, and five minutes later, the process repeats.
A sinking office chair is more than a minor annoyance; it’s a productivity killer and a physical strain. When your chair loses its height, your ergonomic alignment is shattered. Your wrists angle upward to reach the keyboard, your neck cranes toward the monitor, and your lower back loses the support it desperately needs.
At LeisureMod, we believe that a high-quality office chair is an investment in your career and your health. While our chairs are built to withstand years of rigorous use, the gas lift cylinder—the pressurized heart of any modern office chair—eventually wears out due to seal failure.
The good news? You don't need to throw away your favorite chair. In this guide, we’ll show you exactly how to fix a sinking office chair by turning it upside down and performing a professional-grade cylinder replacement.
Phase 1: Understanding Why Chairs Sink
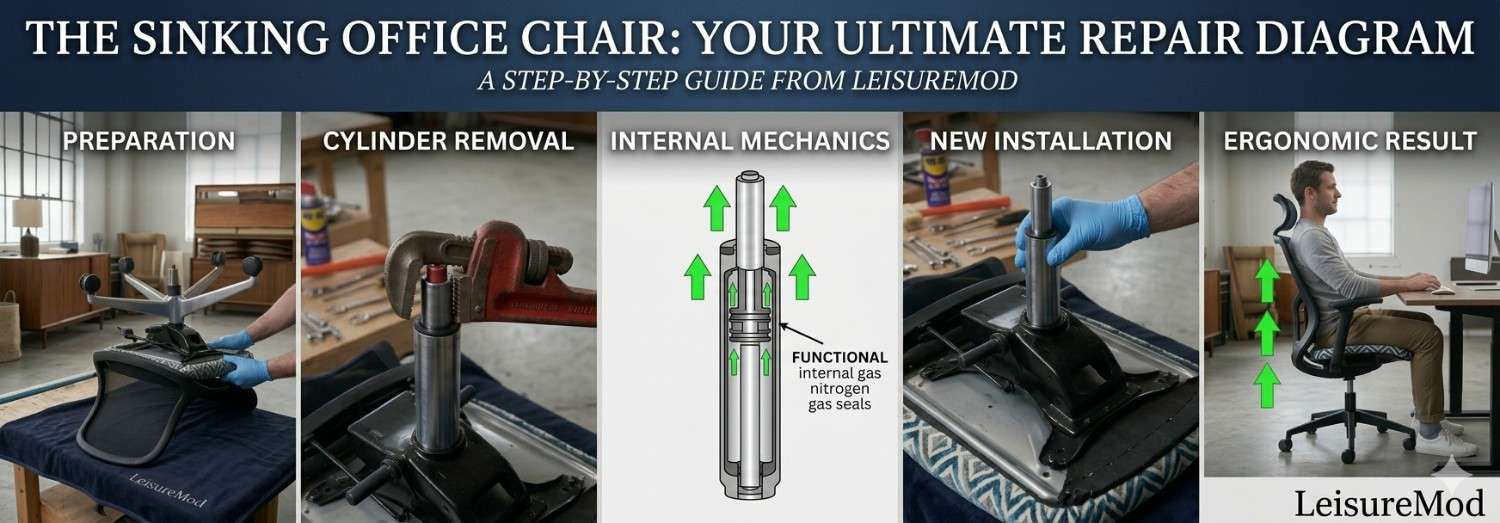
Before we grab the tools, let’s look at the science of the "sink." Most modern desk chairs, including the premium collections at LeisureMod, use a Gas Lift Cylinder.
This cylinder is filled with pressurized nitrogen gas. When you pull the lever, you open a valve that allows the gas to move, raising or lowering the seat. Over several years, the rubber seals inside this cylinder can become brittle or develop microscopic leaks. Once the pressure starts to escape, the cylinder can no longer support your weight, resulting in that frustrating "slow sink."
Can you "refill" the gas?
Unfortunately, no. These cylinders are factory-sealed for safety. Attempting to puncture or refill them is dangerous. The only permanent, professional solution is to replace the cylinder entirely.
Phase 2: Preparation and Safety

To fix your chair properly, you need a clear workspace and the right gear. Because we will be turning the chair upside down, we need to protect the aesthetics of the chair—especially if you own a luxury piece with velvet or leather upholstery.
1. Gather Your Tools
-
A Pipe Wrench (Large): This is the most critical tool for gripping the old cylinder.
-
A Rubber Mallet or Hammer: To knock the cylinder loose from the base.
-
A Screwdriver: (Optional, depending on your chair’s specific assembly).
-
WD-40 or Penetrating Oil: Crucial for loosening metal-on-metal friction.
-
A Soft Blanket or Rug: To protect the seat while the chair is upside down.
-
A Replacement Gas Cylinder: Ensure you buy one that matches the weight capacity of your LeisureMod chair.
2. Create a "Surgery" Station
Clear a space on a hard floor (not carpet, as oil might drip). Lay down your blanket. This ensures that while you are working on the mechanical parts, the beautiful finish of your LeisureMod seating remains pristine.
Phase 3: The Deconstruction (Turning it Upside Down)

Now, let’s get to work. Follow these steps carefully to avoid damaging the chair frame.
Step 1: Flip and Inspect
Carefully turn the chair upside down so the wheels are facing the ceiling. Rest the top of the backrest and the seat on your padded blanket.
Step 2: Remove the Caster Base
The chair is composed of three main parts: the seat, the cylinder, and the 5-star wheel base.
-
Look at the bottom of the wheel base where the cylinder pops through.
-
In many cases, there is a small retaining clip. If present, remove it with a screwdriver.
-
Use your rubber mallet to strike the center of the base (where the cylinder is stuck). Hit it firmly, rotating the base between strikes. Eventually, the wheel base will slide off, leaving the cylinder sticking out of the bottom of the seat.
Step 3: Loosening the Cylinder from the Seat
This is the hardest part. The cylinder is held into the seat mechanism by a "tapered fit"—essentially, the weight of people sitting on it for years has wedged it extremely tight.
-
Apply WD-40 to the joint where the cylinder enters the seat plate.
-
Wait 10–15 minutes. Let gravity pull the oil into the crevice.
-
The Pipe Wrench Trick: Attach your pipe wrench to the cylinder as high up (close to the seat) as possible. Tighten it until it bites into the metal.
-
Give the wrench a sharp, heavy twist. You aren’t trying to unscrew it; you are trying to break the friction seal. Once it rotates, you can pull it out easily.
Phase 4: Installing the New Cylinder

Installing the new part is significantly easier than removing the old one, but precision is still key.
Step 1: Clean the Contact Points
Take a paper towel and wipe away any old grease or metal shavings from the hole in the seat plate and the hole in the wheel base. A clean surface ensures a secure fit.
Step 2: The Alignment
-
Insert the top of the new gas cylinder (usually the end with the plastic button) into the seat mechanism.
-
Slide the 5-star wheel base over the bottom of the cylinder.
Step 3: The "Weight Set"
You don't need tools to tighten the new parts. Simply flip the chair back onto its wheels.
-
Make sure it is on a level surface.
-
Sit in the chair. Your body weight will instantly press the tapered ends of the cylinder into the seat and base, locking them in place.
-
Test the lever. You should feel a crisp, immediate response as the chair rises.
Phase 5: Alternative "Quick Fixes" (And Why to Avoid Them)
If you’ve searched "how to fix sinking office chair," you’ve likely seen "hacks" involving PVC pipes or hose clamps. At LeisureMod, we advise against these for several reasons:
-
Safety: Hose clamps can snap under pressure.
-
Adjustability: Using a PVC pipe locks your chair at one height. You lose the ergonomic benefit of adjusting your chair to different desk heights or tasks.
-
Aesthetics: A luxury office chair looks significantly worse with a plastic pipe taped to the stem.
-
Resale Value: A proper cylinder replacement maintains the integrity and value of your furniture.
Phase 6: Maintaining Your Ergonomic Setup
Once your chair is fixed, it’s a great time to audit your workspace ergonomics. A chair at the right height is only the beginning.
-
The 90-Degree Rule: Your knees should be at a 90-degree angle with your feet flat on the floor.
-
Elbow Alignment: Your armrests should be level with your desk so your shoulders remain relaxed.
-
Eye Level: The top third of your monitor should be at eye level. If your chair is now higher than before, you may need a monitor riser.
When is it time for a new chair?
While a cylinder can be replaced, other signs suggest it might be time to browse the LeisureMod catalog for an upgrade:
-
Frame Instability: If the chair wobbles side-to-side, the internal housing may be worn.
-
Foam Fatigue: If you can feel the hard plastic or wood through the seat cushion, the high-density foam has reached the end of its life.
-
Upholstery Wear: If the fabric or leather is cracked or peeling beyond repair.
The LeisureMod Difference: Quality That Lasts
At LeisureMod, we don't just sell furniture; we curate environments. Our chairs are designed with a focus on mid-century modern aesthetics combined with 21st-century engineering.
By choosing to fix your chair rather than replace it, you are participating in a more sustainable furniture cycle. However, if your current chair doesn't offer the lumbar support or the style you desire, our collection features top-tier gas lift technology and premium materials that are designed to minimize the mechanical failures common in "big box" store chairs.
Conclusion: Reclaiming Your Workspace
Fixing a sinking office chair is a rewarding DIY project that saves you money and restores your comfort. By turning the chair upside down and following the proper mechanical steps, you can give your favorite desk chair a second life.
No more sinking. No more mid-day adjustments. Just a stable, supportive seat that lets you focus on what truly matters—your work.
Ready to upgrade your home office? Explore the LeisureMod Office Collection for chairs that blend iconic style with uncompromising durability.